Getting overlay networking to work in AWS with Docker 1.9
Contents
Update on 4.12.2015 Docker-machine 0.5.2 has been released and it works against systems using systemd, so it’s not necessary to compile it manually any more.
General
Docker 1.9 was released a while ago and with it the networking model was redone. Most interesting feature is the overlay networking which enables a seamless networking between containers on different hosts. The current examples mainly use VirtualBox and demonstrate how things work locally. In this article I go through the steps needed to get the overlay networking to function in AWS using Docker Machine and Swarm.
Prerequisites
Docker Machine version 0.5.2-dev
NB! This step isn’t needed any more
For overlay networking to work the host needs to have kernel which is at least version 3.19. Most of the images available in AWS don’t yet run that (CoreOS, REL), but Ubuntu 15.10 does. The default Ubuntu for Docker Machine in AWS is 14.10, so a different AMI needs to be defined. This leads to an issue with Docker Machine where it has been designed to work against an Ubuntu system using Upstart instead of systemd that the 15.04 version uses. Luckily a PR has already been merged to Docker Machine (#1891), but as of now this requires a compilation of Docker Machine. The process for this is explained here. I used the local go based build.
Finding out the AMI for Ubuntu 15.10 in your region
As the AMI has to be given when the machine is created, it needs to be looked up from here. These examples are running in eu-central-1 so the corresponding AMI for hvm is then ami-fe001292.
Setting up the AWS environment variables
In the shell set up the AWS variables for your AWS account. Information about that can be found from this blogpost.
1
2
3
4
5
export AWS_ACCESS_KEY_ID=<secret key>
export AWS_SECRET_ACCESS_KEY=<secret access key>
export AWS_VPC_ID=<vpc-id>
export AWS_DEFAULT_REGION=<region>
export AWS_ZONE=<zone>
Creating the infra node
For overlay networking to found you first have to set up an external store for it. I mainly use Consul, so we can start of by creating the node we’ll call Infra.
1
docker-machine create -d amazonec2 infra-aws
If the environment variables are correct, this should create a machine which uses the default Ubuntu 14.10 based image.
Now we’ll start a Consul instance there.
1
docker $(docker-machine config infra-aws) run -d -p 8500:8500 -h consul progrium/consul -server -bootstrap
Creating swarm master
Next we’ll create the swarm master with a newer Ubuntu 15.10 based image. This requires a new version of Docker Machine that can provision systemd based system instead of the older upstart. See the note under prerequisites for getting that. If the following command times out and fails, it’s probably to do with the provisioning failing.
1
docker-machine -D create -d amazonec2 --swarm --swarm-master --swarm-discovery="consul://$(docker-machine inspect --format '{{.Driver.PrivateIPAddress}}' infra-aws):8500" --engine-opt="cluster-store=consul://$(docker-machine inspect --format '{{.Driver.PrivateIPAddress}}' infra-aws):8500" --amazonec2-ami=ami-fe001292 --engine-opt="cluster-advertise=eth0:2376" swarm-0-aws
You can add debug information to see the progress of the provisioning by adding -D or –debug straight after the docker-machine command.
Creating the overlay network
1
docker $(docker-machine config swarm-0-aws) network create --driver overlay overlay-1
Creating swarm member
Now we’ll add another node to the swarm.
1
docker-machine create -d amazonec2 --swarm --swarm-discovery="consul://$(docker-machine inspect --format '{{.Driver.PrivateIPAddress}}' infra-aws):8500" --engine-opt="cluster-store=consul://$(docker-machine inspect --format '{{.Driver.PrivateIPAddress}}' infra-aws):8500" --amazonec2-ami=ami-fe001292 --engine-opt="cluster-advertise=eth0:2376" swarm-1-aws
Testing connectivity
We can then launch containers through the swarm but for demonstrating the connectivity we’ll just launch them directly into the swarm members.
Launching first container to swarm-0-aws
When launching a container, we define the overlay-1 network as the network it should join. All containers are also by default part of the bridge of the node so that they have also outside connectivity.
1
docker $(docker-machine config swarm-0-aws) run -it --rm --name test1 --net=overlay-1 alpine /bin/sh
Launching second container
In another terminal run
1
docker $(docker-machine config swarm-1-aws) run -it --rm --name test2 --net=overlay-1 alpine /bin/sh
Containers in different nodes
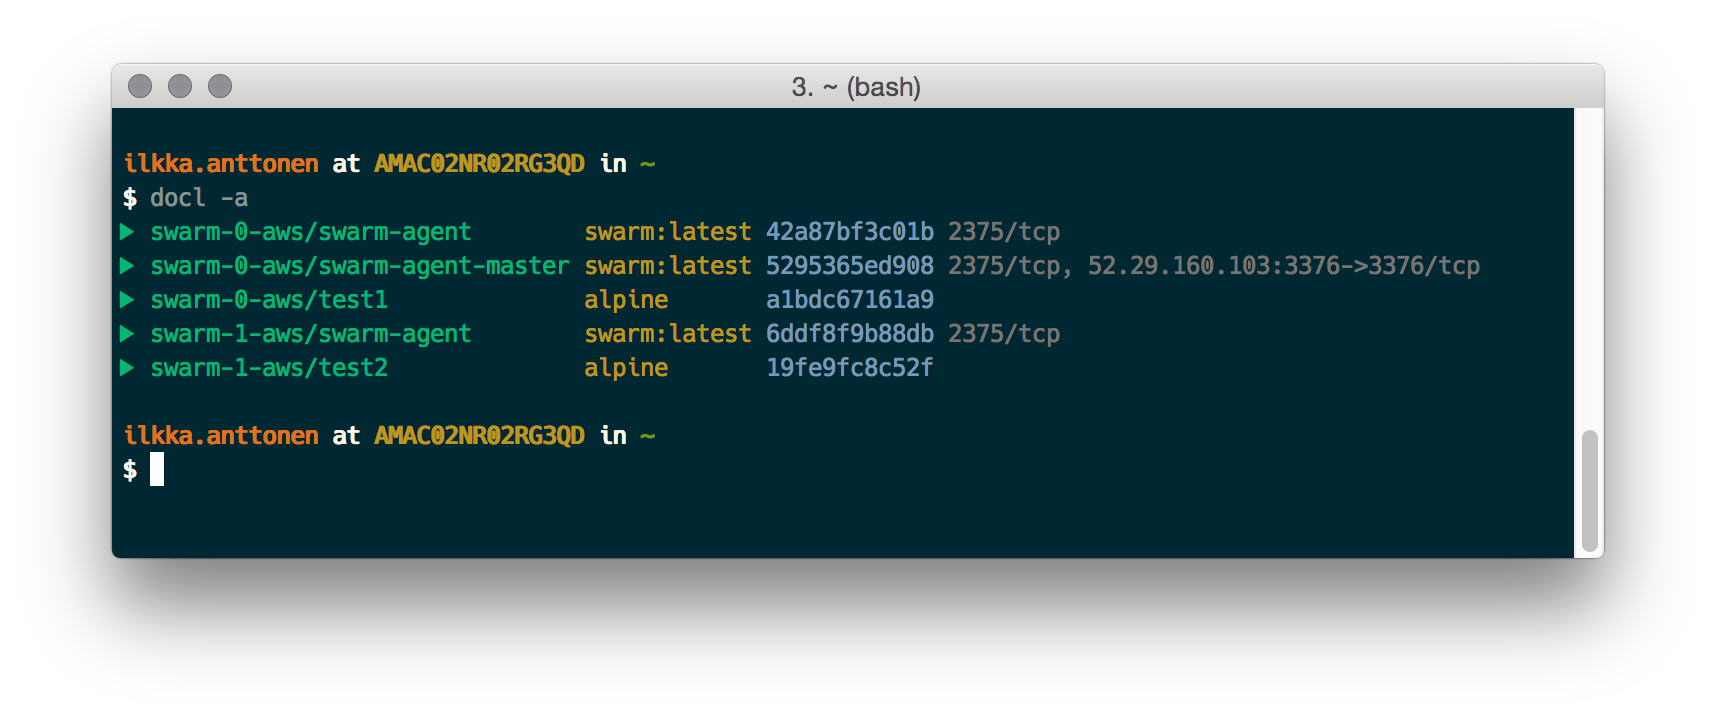
You should be able to check that containers are really running on different nodes. I’m using a script by pixelastic.

Ping between the containers
Now in the first window you can ping the second container whose name has been added to the /etc/hosts.
1
2
3
4
5
6
7
8
9
10
11
12
13
14
15
16
17
18
/ # cat /etc/hosts
10.0.0.2	a1bdc67161a9
127.0.0.1	localhost
::1	localhost ip6-localhost ip6-loopback
fe00::0	ip6-localnet
ff00::0	ip6-mcastprefix
ff02::1	ip6-allnodes
ff02::2	ip6-allrouters
10.0.0.3	test2
10.0.0.3	test2.overlay-1
/ # ping test2
PING test2 (10.0.0.3): 56 data bytes
64 bytes from 10.0.0.3: seq=0 ttl=64 time=0.807 ms
64 bytes from 10.0.0.3: seq=1 ttl=64 time=0.674 ms
^C
--- test2 ping statistics ---
2 packets transmitted, 2 packets received, 0% packet loss
round-trip min/avg/max = 0.674/0.740/0.807 ms
and vice versa in the second container
1
2
3
4
5
6
7
8
9
10
11
12
13
14
15
16
17
18
/ # cat /etc/hosts
10.0.0.3	19fe9fc8c52f
127.0.0.1	localhost
::1	localhost ip6-localhost ip6-loopback
fe00::0	ip6-localnet
ff00::0	ip6-mcastprefix
ff02::1	ip6-allnodes
ff02::2	ip6-allrouters
10.0.0.2	test1
10.0.0.2	test1.overlay-1
/ # ping test1
PING test1 (10.0.0.2): 56 data bytes
64 bytes from 10.0.0.2: seq=0 ttl=64 time=0.795 ms
64 bytes from 10.0.0.2: seq=1 ttl=64 time=0.740 ms
^C
--- test1 ping statistics ---
2 packets transmitted, 2 packets received, 0% packet loss
round-trip min/avg/max = 0.740/0.767/0.795 ms
Conclusion
The overlay networking works in AWS, but requires a new enough kernel from the node. Otherwise things are a lot simpler to set up with Docker 1.9 than they were previously and I’m happy to see that the outside connectivity issues have been solved.
Comments